RTK status
The RTK status dialog shows details of the RTK correction data coming from the selected base station towards the UAVs.
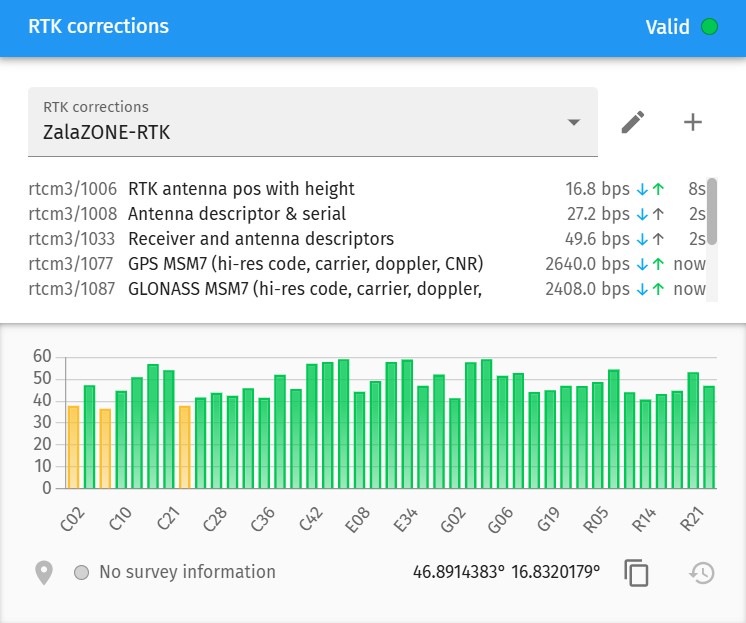
The status indicator at the top right corner of the dialog shows you whether the currently selected RTK source is active or not.
RTK corrections dropdown
To enable RTK connections, first select your RTK correction source from the dropdown list at the top of the dialog. You can predefine new entries with configuring the rtk extension of your running Skybrush Server instance, or by creating global presets with the Create new RTK preset button on the right side of the RTK corrections dropdown.
Create new RTK preset
Use this button to open the following dialog and create a new RTK correction source preset.
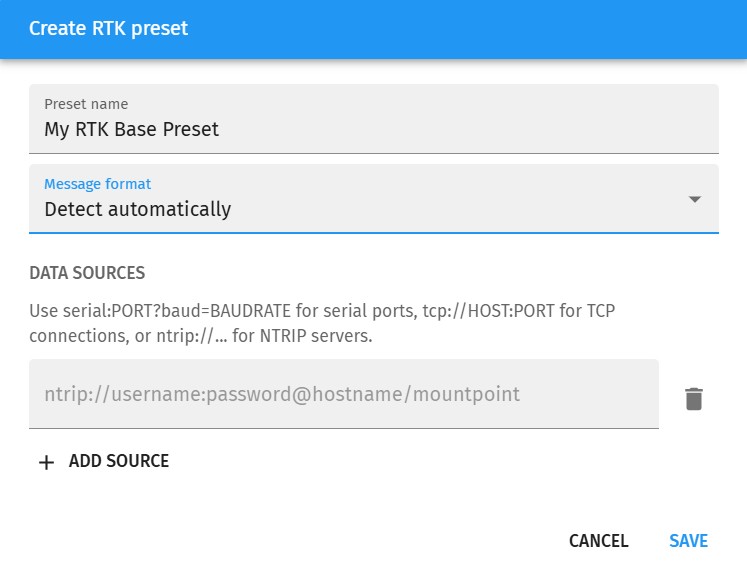
When creating a new preset, you need to define a custom name, the main message format of the preset (RTCM2, RTCM3, UBX, or autodetected), and the list of data sources for the preset.
Edit preset
Use this button to edit the currently selected RTK preset. Presets defined in the Skybrush Server configuration file are read-only, while presets defined in Skybrush Live are editable any time.
RTCM message details
The top of the panel lists all RTCM messages configured for or available from the given RTK correction source. For each RTCM message type you can see the average bitrate (bps) occupied by the given RTCM message type, the enabled/disabled state on an RTCM message type according to the server’s rtk filter configuration (blue downwards arrow if the given message type is received from the RTK correction source by Skybrush Server, and green upwards arrow if the message is configured to be forwarded from the Skybrush Server to the UAVs), and the time since the last message of a given type was sent to the UAVs.
Satellite details
At the bottom of the dialog you can check the visibility / signal strength of individual satellites and see which ones are used for RTK correction.
Auto survey
When the RTK source is a local base station, it starts up automatically in surveying mode to find out its own location before transmitting the correction signals.
| The currently supported RTK sources with auto-surveying functionality is listed in the Hardware requirements section. |
Manual survey
If you press the Start new survey button at the bottom-left of the dialog, you can initiate a new survey with providing custom minimum length and required accuracy.
If surveying is in progress or is ready, the actual surveying accuracy is also indicated here.
Antenna position
If surveying is successful or the base station is setup manually to a fixed position, the position of the base station will be indicated at the bottom-right of the dialog window (you can toggle between ECEF and lat/lon display by clicking on the actual coordinates).
Press the Copy to clipboard button at the bottom-right of the dialog to copy the coordinates to the clipboard.
Note that Skybrush Live preserves the antenna position of the last few surveys, so if you lose your connection to the RTK base station or to Skybrush Server and reconnect, you can choose from recent surveys and you do not have to worry about spending your precious time again for a new survey.
Press the Use saved coordinate button at the bottom-right of the dialog to recall a previously saved antenna position manually.
| Always trigger a new survey if you move your RTK base station physically. |
Use saved coordinate
Press this button in the bottom-right corner to reload one of the previously measured antenna positions. This feature is useful if you lose connection to your RTK base station or Skybrush Server for any reason, while your physical setup remains unchanged (i.e., you have not moved the RTK antenna). In such cases, you can reuse an already measured, precise antenna position instead of performing another time-consuming survey.