Software installation
Skybrush Studio for Blender is a platform independent tool, just like Blender. The installation procedure is very similar for Linux, macOS and Windows. Please follow the steps below.
Hardware requirements
We suggest following the official Blender recommendation for choosing your computer on which you want to run Blender and Skybrush Studio for Blender.
The community and the cloud version of Skybrush Studio requires an active Internet connection on your computer as Skybrush Studio needs to communicate with our cloud-based server for certain tasks such as planning transitions or creating exports in Skybrush compiled show format.
You may use the software without Internet connection, but certain functions that require an Internet connection will not be available until you go online again.
Install Blender
Blender is the main open-source 3D animation software hosting the Skybrush Studio for Blender addon.
There are many Blender versions available. We aim for compatibility with the latest Long Term Support (LTS) release. This is version 4.5 at the time of writing. If you are unsure, check the version number of the latest Long Term Support (LTS) release on the Blender site.
After installing Blender, there are a few general preferences that need to be set up properly.
Enable Online Access
Starting from Blender 4.2, the preferences dialog provides an option where the user can explicitly indicate that they wish to allow (or deny) access to online resources. Skybrush Studio for Blender relies on an external server/backend component in all of its operation modes to calculate transitions, decompose formations, plan takeoffs and landings and export the show into various file formats. According to Blender terms it counts as an "online resource" even if it is running locally. So if you want to use the full capabilities of the add-on, you need to enable online access if you are running Blender 4.2 or later. Earlier versions of Blender are not affected.
To turn on online access, open Blender and go to Edit → Preferences → System, scroll down to the "Network" section and then tick the "Allow Online Access" checkbox.
Setup network timeout in Blender
If you use large fleets and/or long and fine-grained shows, make sure that the "Network timeout" setting right below the "Allow Online Access" checkbox is large enough to handle your requests to your local Skybrush Studio Server or to the online community/cloud server.
The longest action is usually the show export. During export, most time is taken by the sampling of your show within Blender to form the input of the requests towards Skybrush Studio Server. Even though this procedure is not part of the request time, with large shows you may run into cases where you do need more processing time than the default 10 seconds. If such timeout occurs, raise the value as convenient.
Install Skybrush Studio for Blender
Skybrush Studio for Blender can be downloaded from https://skybrush.io as a single .zip file. Please download it to your computer first and then follow the instructions below.
Safari on macOS automatically unzips all .zip files by default, which will prevent you from selecting the .zip file itself when installing the plugin. If you are using Safari on macOS, hold down the Option key when clicking on the download link to prevent this from happening, or turn off the unzipping of "safe" files permanently in .
|
-
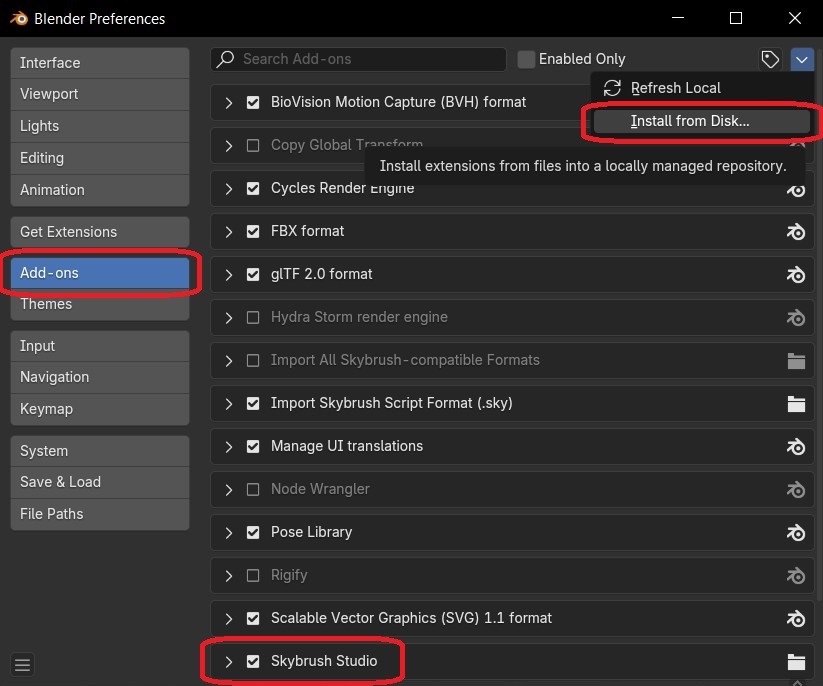
Open Blender and go to Edit → Preferences → Add-ons.
-
Select Install from Disk… from the dropdown menu in the top right corner.
-
In the popup window select the Skybrush Studio for Blender
.zipfile that you have downloaded previously to your computer, and press Enter. -
Once installed, activate the "Skybrush Studio" add-on by clicking on the checkbox next to this item in the add-on list (you may need to scroll down to find the "Skybrush Studio" item, or start typing it into the search box at the top).
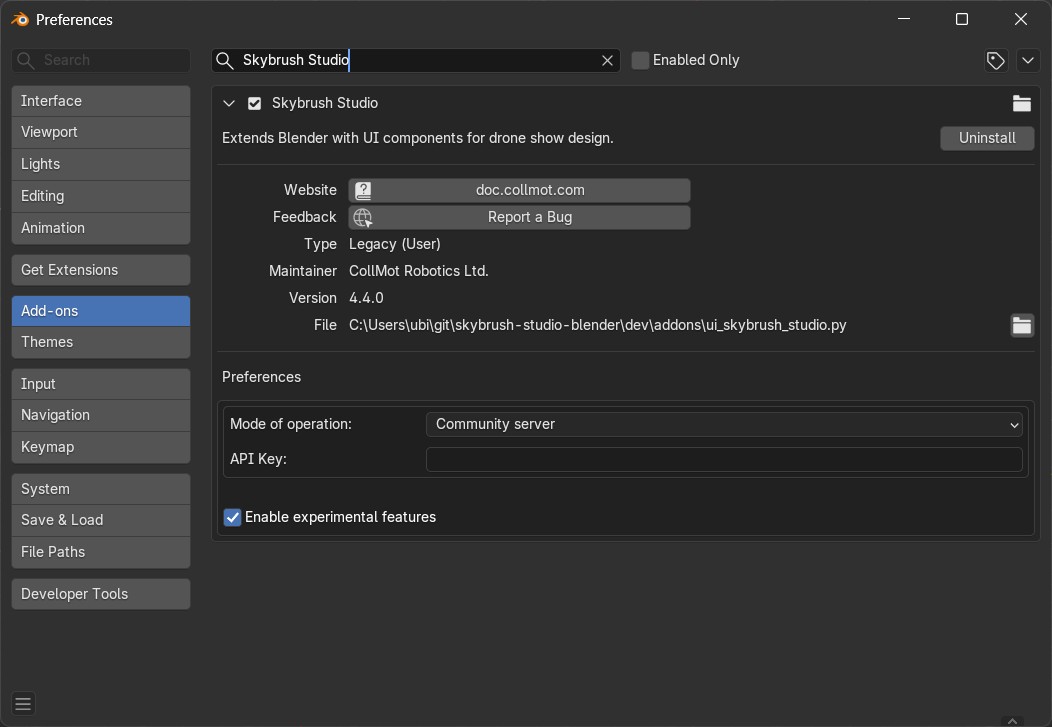
After installation, open add-on preferences by pressing the > button on the left side of the "Skybrush Studio" add-on item.
Modes of operation
There are four basic modes of operation of Skybrush Studio, all of which requiring a slightly different setup. Use the Mode of operation dropdown to select your preference from the followings:
- Community server
-
This is the free community mode of operation that does not require any additional settings or setup.

You can try Skybrush Studio for Blender in community mode without any license, but be prepared that it might be limited in drone number, execution time or available features.
- Local Skybrush Studio Server
-
Use this mode of operation if you have purchased Skybrush Studio or Skybrush Studio X from our webshop.

This mode of operation requires a local copy of Skybrush Studio Server to be installed and running on your machine (see installation procedure at the Install Skybrush Studio Server section.).
- Skybrush Studio Cloud
-
Use this mode of operation if you have purchased Skybrush Studio Cloud or Skybrush Studio X Cloud from our webshop.

This mode of operation requires Skybrush Gateway to be installed and running on your machine (see installation procedure at the Install Skybrush Gateway section).
Once you installed and started Skybrush Gateway, the unique hardware ID of your machine should appear in the Hardware ID field automatically. If you see your hardware ID, press the Register button to register it in your Skybrush Account to be able to assign your dynamic cloud-based license to your current machine.
- Advanced setup
-
Use this mode of operation if you wish to change the default settings for the three standard modes of operation listed above.
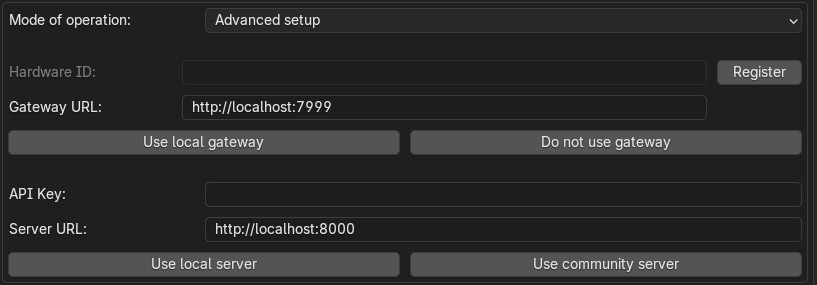
The Gateway URL field shows the URL of Skybrush Gateway available for cloud license holders only. By default you do not have to touch this setting manually, change only if you know what you are doing. Press the Use local gateway button if you have installed Skybrush Gateway and it is already running on your machine locally. This action will fill the Gateway URL field automatically. Press the Do not use gateway button if you do not want to use Skybrush Gateway for your operations. This action will clear the Gateway URL field automatically.
The API key field should be left blank unless you have been issued an API key by us for communication with the online community or cloud server. If you have received a key, enter it in this field.
The Server URL field shows the URL of your local Skybrush Studio Server available for offline license holders only. By default you do not have to touch this setting, change only if you know what you are doing. Press the Use local server button if you have purchased a professional local copy of Skybrush Studio Server that is running on your own machine. This action will fill the Server URL field automatically. Press the Use community server button to use the online community or cloud server. This action will clear the Server URL field automatically.
Install Skybrush Gateway
| You need to install Skybrush Gateway only if you have purchased Skybrush Studio Cloud or Skybrush Studio X Cloud from our webshop. |
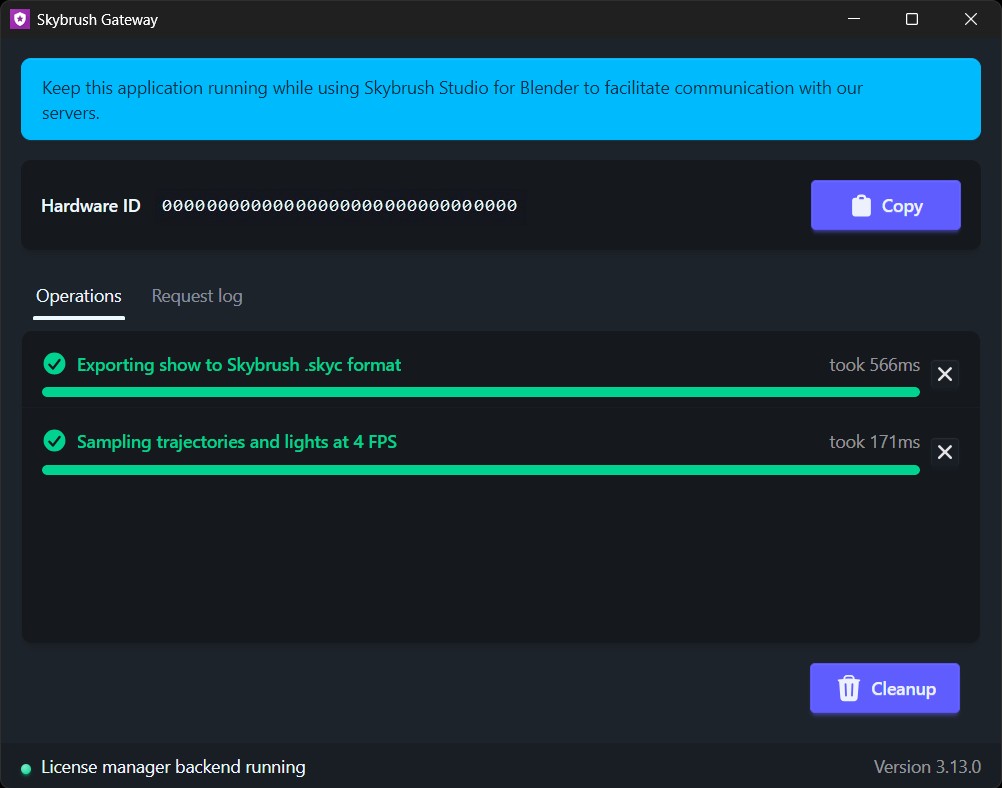
Skybrush Gateway is a local component running on your machine, responsible for signing your requests towards our cloud server to provide a cryptographic proof about the identity of users. It also shows you real-time progress information for your long lasting Blender tasks.
-
Download the installer of Skybrush Gateway from your Skybrush Account.
-
Execute the installer to install Skybrush Gateway on your computer.
-
Always start Skybrush Gateway before starting Blender, and keep it running throughout your entire design process to facilitate trusted signing of your requests towards our online server.
-
Set the Operation mode dropdown to "Skybrush Studio Cloud" in the Skybrush Studio add-on preferences in Blender and press the Register button to register your machine’s hardware ID to be used with your cloud-based license automatically.
-
After registering your hardware ID in your Skybrush Account, also make sure it is assigned to the proper Skybrush Studio Cloud product you obtained a license for, using the Link hardware ID button in your account. Activation of your cloud based license will be automatic once you assign a hardware ID to it and start to use it.
Install Skybrush Studio Server
| You need to install Skybrush Studio Server only if you have purchased Skybrush Studio or Skybrush Studio X from our webshop. |
Skybrush Studio Server is the local server backend of Skybrush Studio for Blender. It is responsible for running all the complicated maths behind the scenes and thus lets you use all the automated smart design tools available in the Blender plugin in a completely offline context.
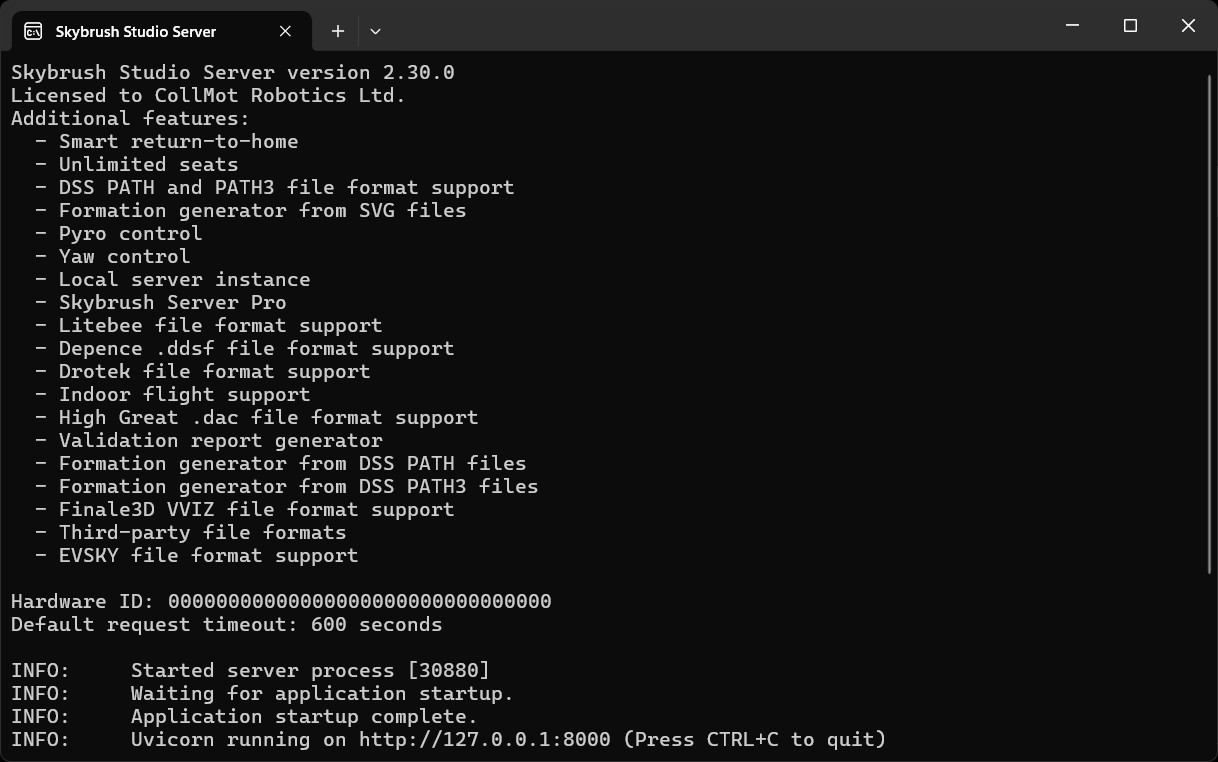
-
Download the installer of Skybrush Studio Server from your Skybrush Account and execute the installer to install the server on your computer.
-
After installation, execute Skybrush Studio Server once. It will open a terminal window and will display the hardware ID of your machine. Copy this hardware ID for further reference.
-
Register the hardware ID of your machine at your Skybrush Account.
-
In your Skybrush Account make sure your registered hardware ID is also assigned to the proper Skybrush Studio product you obtained a license for, using the Link hardware ID button in your account.
-
Activate your offline license with downloading it from your Skybrush Account using the Download license button on the right side of the purchased product listed in your account. Note that offline licenses are not revokable or reassignable. They contain a permenent link to the machine they are assigned to throughout the entire validity of the license period
For dynamic seat management use the cloud-based licensing options. -
Download your license file named
skybrush-studio-server.cmland copy it to the folder where you installed the server itself (If you cannot determine this path, run the server and it will display the expected location of the license file). You might need system administrator privileges to write into this folder.The terminal log of Skybrush Studio Server will give you instant feedback about the presence and content of your currently used license file upon execution of the server.
-
Finally, do not forget to set the Operation mode dropdown to "Local Skybrush Studio Server" in the Skybrush Studio add-on preferences in Blender.
Installing updates
Skybrush Studio for Blender consists of multiple modules that are interpreted by the Python interpreter built into Blender. To perform an upgrade of the add-on, the previous version needs to be unloaded completely before the new version is installed. Due to how Python’s module system works, this is very hard to do without unloading the plugin manually. Therefore, the preferred sequence to update the add-on is as follows:
-
Deactivate the add-on in Edit → Preferences → Add-ons by unticking the checkbox in front of the Skybrush Studio add-on.
-
Install the new version of the add-on using the same procedure as outlined above.
-
Exit Blender.
-
Restart Blender.
-
Activate the add-on again in Edit → Preferences → Add-ons.
| If the update still fails after following the steps outlined above, try to completely uninstall the old add-on first manually (as described below) and then re-install the new one from scratch. |
Updates to additional pro components (Skybrush Studio Server or Skybrush Gateway) are straightforward. Just download the new installers and execute them, the update will be automatic.
Uninstallation
If you decide to uninstall Skybrush Studio for Blender for any reason, you have to do it manually. Removing the add-on from Blender’s add-on manager is possible, but it will not remove all files related to Skybrush Studio for Blender. The full, manual process is as follows:
-
Deactivate the add-on first in Blender’s add-on manager.
-
Open the file manager of your operating system and navigate to the folder containing the Blender add-ons. Refer to Blender’s documentation to find the add-ons folder.
-
Remove the file named
ui_skybrush_studio.py. -
Also remove the
skybrushfolder within thevendorfolder.
Uninstallation of additional pro components (Skybrush Studio Server or Skybrush Gateway) are straightforward. Just uninstall them the same way as you uninstall any other standard application from your system.